PowerWP Documentation

Introduction

PowerWP is a clean and user friendly, fully responsive, 3 columns WordPress blogging theme. It features a responsive and mobile-friendly design, Customizer theme options, a primary navigation menu, full-width templates for posts and pages, sticky sidebars, a 3-column layout with left and right sidebars, a header widget area, a 4-column footer widgets area, social buttons, a scroll-to-top button, RTL language support, and more. The theme is very starter-friendly and easy to set up.

Quick Start Guide

  1. Install & activate the theme via Appearance → Themes → Add New.
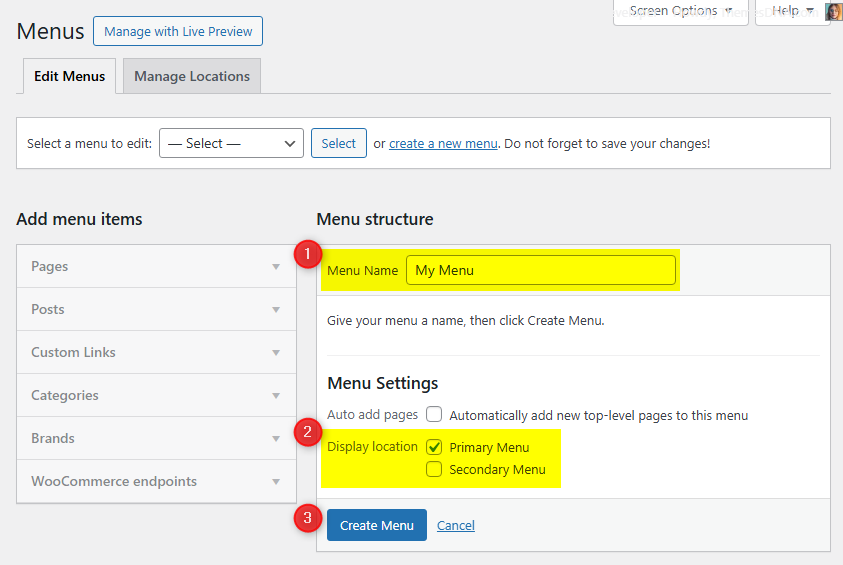
  2. Set up your menu by going to Appearance → Menus. Create a menu and assign it to the Primary Menu location.
  3. Configure widgets by going to Appearance → Widgets. Add widgets to the available widget areas (Header Banner, Sidebar 1, Sidebar 2, Footer 1-4).
  4. Customize by going to Appearance → Customize → Theme Options. Set up your social links, post options, footer options, and more.

Theme Features

  • Responsive Design
  • 3-Column Layout (Left Sidebar, Content, Right Sidebar)
  • Sticky Sidebars
  • 1 Navigation Menu (Primary)
  • Header Banner Widget Area
  • 2 Sidebars and 4 Footer Widget Columns
  • 25+ Social Profile Links
  • Custom Logo Support
  • Custom Header Image
  • Custom Background
  • Author Bio Box
  • Full-Width Templates for Posts and Pages
  • List and Full Post Styles for Post Listings
  • RTL Language Support
  • Translation Ready
  • Back to Top Button
  • FitVids.JS for Responsive Videos

Theme Installation

Method 1: Install via WordPress Dashboard (Recommended)

  1. Log in to your WordPress Dashboard.
  2. Navigate to Appearance → Themes → Add New.
  3. Search for PowerWP in the search box.
  4. Click Install on the PowerWP theme, then click Activate.

Method 2: Upload via WordPress Dashboard

  1. Download the powerwp.zip theme file from WordPress.org.
  2. Log in to your WordPress Dashboard.
  3. Navigate to Appearance → Themes → Add New → Upload Theme.
  4. Click Choose File, select the powerwp.zip file, and click Install Now.
  5. After installation, click Activate.

Method 3: Upload via FTP/File Manager

  1. Download the powerwp.zip theme file and extract it.
  2. Connect to your server via FTP (FileZilla) or use your hosting File Manager.
  3. Upload the extracted powerwp folder to /wp-content/themes/.
  4. Go to your WordPress Dashboard → Appearance → Themes and activate PowerWP.

Troubleshooting Installation Issues

  • "The uploaded file exceeds the upload_max_filesize directive" – Your hosting limits file uploads. Increase the limit via php.ini, .htaccess, or contact your host. Alternatively, use FTP.
  • "The package could not be installed. The theme is missing the style.css stylesheet" – You may be uploading the wrong file. Make sure you upload only the powerwp.zip file.

Import Demo Content

You can import the demo content, widgets, and Customizer settings shown in the PowerWP theme demo.

Manual Demo Import

Step 1: Import Main Site Content

This includes: Posts, pages, menus, media, categories, tags, comments, and custom fields.

  1. Download: XML File
  2. Go to Tools → Import.
  3. Under "WordPress", click Install Now if not installed.
  4. Click Run Importer.
  5. Select the XML file and click Upload file and import.
  6. Check "Download and import file attachments", click Submit.

Step 2: Import Widgets

  1. Install the Widget Importer & Exporter plugin.
  2. Go to Tools → Widget Importer & Exporter.
  3. Copy content from: Widgets .wie File and paste into the box.
  4. Click Import Widgets.

Step 3: Import Customizer Settings

  1. Download: Customizer File
  2. Install the Customizer Export/Import plugin.
  3. Go to Appearance → Customize → Export/Import.
  4. Select the .dat file, check "Download and import image files?", click Import.

Regenerate Thumbnails

If your website already has existing posts with featured images, it's highly recommended to regenerate thumbnails after activating the PowerWP theme. This ensures that all images match the new theme's layout and display sizes.

Regenerating thumbnails is optional if your site is completely new and doesn't have any uploaded images yet.

However, if you imported the demo content, regenerating thumbnails is essential to display images correctly across the site.

  1. Install and activate the Regenerate Thumbnails plugin.
  2. Go to Tools → Regenerate Thumbnails.
  3. Click the "Regenerate Thumbnails for All x Attachments" button to start the process.
  4. Wait until all images are regenerated. This may take a few minutes depending on your media library size.
  5. If you want, you can deactivate and delete the plugin once the process is complete.

This step ensures clean image alignment and sharp visuals throughout your website using the PowerWP theme.

Header Image

Use the WordPress Customizer to add or manage the header image that appears at the top of your site.

How to add a header image

  1. Go to Appearance → Customize → Header Image.
  2. Click Add new image and choose/upload your image (recommended width: 1270px or larger).
  3. Crop if prompted, then click Publish.

The header image is displayed at the top of the site, above the logo/site title area, and links to your homepage. If no header image is set, this area is hidden. The theme uses a flexible-height header, so images with different heights are supported.

Widget Areas

There are 7 widget areas in the PowerWP theme. The free version does not bundle custom widgets; use WordPress core widgets or plugins of your choice inside these areas.


  1. Header Banner

    Widget area located in the header of the web page, next to the logo/site title. Ideal for banner ads.

  2. Sidebar 1

    Left-hand sidebar for your pages/posts.

  3. Sidebar 2

    Right-hand sidebar for your pages/posts.

  4. Footer 1

    Footer column 1 (left).

  5. Footer 2

    Footer column 2.

  6. Footer 3

    Footer column 3.

  7. Footer 4

    Footer column 4 (right).

Page Templates

PowerWP includes two custom templates you can use for full-width layouts without sidebars.

  • Full Width, no sidebar (Page) — Template for pages (template-full-width-page.php)
  • Full Width, no sidebar (Post) — Template for posts (template-full-width-post.php)

How to apply a template

  1. Edit a page or post in the WordPress editor.
  2. In the Page Attributes (or Post Attributes) panel, open the Template dropdown.
  3. Select Full Width, no sidebar and update/publish.

Use featured images with sufficient width (e.g., 1240px+) for best presentation in full-width layouts.

Customizer Theme Options

To see available WordPress Customizer theme options:

  1. Go to your WordPress Dashboard.
  2. Navigate to Appearance → Customize.
  3. Click on Theme Options.

Site Identity Options

Below is the complete list of Site Identity Options available:

Option ID Option Name Description Control Type Accepted Value Default
custom_logo Logo Image ID of the custom logo uploaded through the Customizer. Media Uploader Integer (attachment ID) 0 (none)
blogname Site Title Main title of the website shown in the header, browser-tabs, and search-results. Text A string "My WordPress Site" (installer-set)
blogdescription Tagline Short descriptive sentence (appears next to or below the title when supported by the theme). Text A string "Just another WordPress site"
display_header_text Display Site Title & Tagline Toggles whether the title/tagline are printed on the front-end. When off they remain in the markup for accessibility but are hidden with CSS. Toggle Switch true / false true
site_icon Site Icon (Favicon) Image ID for the favicon/app-icon (512 × 512 px recommended). Used in browser tabs, bookmark tiles and WP mobile app. Media Uploader Integer (attachment ID) 0 (none)

Colors Options

Below is the complete list of Colors Options available:

Option ID Option Name Description Control Type Accepted Value Default
background_colorBackground ColorPick the site Background Color. To change Background Color, need to remove background image first.Color PickerHex color code (e.g. #ffffff)#e4e0db
header_textcolorHeader Text ColorPick the Header Text Color for the site title and tagline.Color PickerHex color code (e.g. #ffffff)#333333

Header Image Options

Below is the complete list of Header Image Options available:

Option ID Option Name Description Control Type Accepted Value Default
header_imageHeader ImageUpload or select a header image. Suggested width is 1270 pixels. The header image is displayed at the top of the site and links to the homepage.Media UploaderImage URL(none)

Background Image Options

Below is the complete list of Background Image Options available:

Option ID Option Name Description Control Type Accepted Value Default
background_imageBackground ImageUpload or select a background image for the site.Media UploaderImage URLassets/images/background.png
background_presetPresetChoose a preset for how the background image is displayed.DropdownDefault / Fill Screen / Fit to Screen / Repeat / CustomDefault
background_position_xImage Position (Horizontal)Horizontal position of the background image.RadioLeft / Center / RightLeft
background_position_yImage Position (Vertical)Vertical position of the background image.RadioTop / Center / BottomTop
background_sizeImage SizeHow the background image is sized.DropdownAuto / Contain / CoverAuto
background_repeatRepeat Background ImageWhether the background image repeats.CheckboxRepeat / No RepeatRepeat
background_attachmentScroll with PageWhether the background image scrolls with the page or is fixed.CheckboxScroll / FixedFixed

Post Options

Below is the complete list of Post Options available:

Option IDOption NameDescriptionControl TypeAccepted ValueDefault
posts_headingHomePage Posts HeadingCustom heading text for the homepage posts area.TextA stringRecent Posts
thumbnail_linkThumbnail LinkDo you want single post thumbnail to be linked to their post?Dropdown
  • Yes
  • No
Yes
post_styleNon-Singular Posts StyleSelect the post style you want for home/categories/tags/archive/search-results pages.Dropdown
  • List
  • Full
List
read_more_lengthAuto Post Summary LengthEnter the number of words need to display in the post summary. Default is 25 words.TextA positive integer25
read_more_textRead More TextCustom text for the read more button/link in post summaries.TextA stringContinue Reading...
hide_posted_dateHide Posted DateHide the posted date from posts.Checkboxtrue / falsefalse
hide_post_authorHide Post AuthorHide the author name from posts.Checkboxtrue / falsefalse
hide_post_categoriesHide Post CategoriesHide post categories from posts.Checkboxtrue / falsefalse
hide_post_tagsHide Post TagsHide tags from single posts.Checkboxtrue / falsefalse
hide_comments_linkHide Comment LinkHide the comment link from posts.Checkboxtrue / falsefalse
hide_post_editHide Post Edit LinkHide the edit link on single posts (for logged-in users with permission).Checkboxtrue / falsefalse
hide_thumbnailHide Thumbnails from Every PageHide featured images/thumbnails from every page of the site.Checkboxtrue / falsefalse
hide_thumbnail_singleHide Thumbnails from Posts/PagesHide featured images from single posts and pages.Checkboxtrue / falsefalse
hide_post_snippetHide Post SnippetHide post snippets/excerpts from post listings.Checkboxtrue / falsefalse
hide_read_more_buttonHide Read More ButtonHide the read more button/link from post listings.Checkboxtrue / falsefalse
hide_author_bio_boxHide Author Bio BoxHide the author biography box on single posts.Checkboxtrue / falsefalse

Other Options

Below is the complete list of Other Options available:

Option IDOption NameDescriptionControl TypeAccepted ValueDefault
enable_widgets_block_editorEnable Gutenberg Widget Block EditorEnable the Gutenberg block-based widget editor instead of the classic widget editor.Checkboxtrue / falsefalse

Translation & RTL

PowerWP is fully translation-ready and supports Right-to-Left (RTL) languages like Arabic, Hebrew, and Persian out of the box.

🌐 Translating the Theme

The theme includes a powerwp.pot file located in the /languages folder inside the theme directory. You can use this file to create translations in your own language using any of the following tools:

After translating, save your files as:

  • powerwp-[language_code].po
  • powerwp-[language_code].mo

Place them inside the /languages folder in the theme.

↔️ RTL Language Support

PowerWP includes built-in RTL support. If your WordPress site language is set to an RTL language, the theme will automatically adjust layout direction, alignment, and spacing accordingly. No extra setup required.

If you're customizing your site with RTL content, make sure your text widgets, menus, and custom styles are also RTL-compatible for best results.

Performance & SEO Tips

Here are some best practices to improve your site's performance and SEO when using PowerWP:

  • Use a caching plugin — Install W3 Total Cache, WP Super Cache, or LiteSpeed Cache to improve page load times.
  • Optimize images — Use plugins like Imagify or EWWW Image Optimizer to compress images.
  • Use a CDN — A Content Delivery Network (e.g., Cloudflare) serves your content from servers closest to your visitors.
  • Install an SEO plugin — Use Yoast SEO or Rank Math to manage meta tags, sitemaps, and structured data.
  • Keep WordPress updated — Always use the latest versions of WordPress, themes, and plugins.
  • Minimize plugins — Only keep the plugins you actually use.
  • Use quality hosting — A good hosting provider makes a significant difference in performance.
  • Set featured images — Always set a featured image for posts to ensure proper display in post listings and when sharing on social media.

FAQ

In this section, you'll find quick answers to the most frequently asked questions about using the PowerWP theme. If you can't find your answer here, you can contact our support team for more help.

My menus disappeared after theme activation. What should I do?

Go to Appearance → Menus → Manage Locations and reassign your existing menus to the correct theme locations.

How do I change the posts style on my homepage?

Go to Appearance → Customize → Theme Options → Post Options and choose a Non-Singular Posts Style: List (post summaries with small thumbnails) or Full (larger post summaries).

How do I add social media links?

Go to Appearance → Customize → Theme Options → Social Links and enter your profile URLs for each social network. The social icons appear in the footer area.

How do I change the footer copyright text?

Go to Appearance → Customize → Theme Options → Footer and enter your custom text in the Footer copyright notice field.

How do I use a static page as my homepage?

  1. Create at least two pages (one for the homepage, one for the blog).
  2. Go to Settings → Reading.
  3. Select A static page under "Your homepage displays".
  4. Choose your homepage and posts page from the dropdowns.
  5. Click Save Changes.

How do I enable sticky sidebars?

The PowerWP theme has sticky sidebars enabled by default using the Theia Sticky Sidebar library. No additional configuration is needed.

How do I add a numbered posts navigation?

Install and activate the WP-PageNavi plugin. The theme will automatically replace the default posts navigation with numbered page navigation.

Troubleshooting

This section covers common technical problems you may encounter. If your issue isn't listed, reach out to our support team.

Post thumbnails are missing when sharing on social media

Install an SEO plugin like Yoast SEO or Rank Math and enable Open Graph tags. Always set a featured image for each post.

I get "The uploaded file exceeds the upload_max_filesize directive" error

Increase the upload limit via php.ini, .htaccess, or contact your hosting provider. Alternatively, use FTP.

The layout looks broken or images are misaligned

Run Regenerate Thumbnails from Tools → Regenerate Thumbnails to ensure all images match the theme's expected sizes. Make sure posts have featured images set.

Widgets are not appearing

Go to Appearance → Widgets and make sure widgets are added to the correct widget areas. Consider disabling "Enable Gutenberg Widget Block Editor" in Theme Options → Other Options.

Support & Licensing

The PowerWP theme is released under the GNU General Public License v2.0 (GPL v2). You can use the theme on unlimited websites and modify the code.

What's included in free support:

  • Help with theme installation and setup
  • Bug fixes and troubleshooting related to the theme
  • Guidance on using built-in theme features

What's not included in free support (but available as paid tasks):

  • Theme customization or resolving third-party plugin conflicts
  • Custom coding or feature implementation requests
  • Performance tuning, SEO setup, or server configuration assistance

If you need help, please contact us. We typically respond within 24-48 hours on working days.

Contact Support

Upgrade to PowerWP PRO

For more features including color options, font options, more layout options, related posts, and much more, consider upgrading to PowerWP PRO.

Changelog & Versioning

The following is a log of all updates and changes made to PowerWP. We recommend always using the latest version.

= Version 1.1.1 =

  • Fixed coding issues.
  • Theme Customizer updated.
  • Many improvements.

= Version 1.1.0 =

  • Fixed coding issues.
  • Theme customizer updated.

= Version 1.0.8 =

  • Fixed coding issues.
  • Theme customizer updated.

= Version 1.0.7 =

  • Fixed minor coding issues.

= Version 1.0.6 =

  • Fixed coding issues.
  • Improved coding.
  • Improved accessibility.

= Version 1.0.5 =

  • Fixed minor coding issues.
  • Screenshot is updated.

= Version 1.0.4 =

  • Fixed minor coding issues.

= Version 1.0.2 =

  • Theme Description is updated.

= Version 1.0.0 =

  • Initial Release.

Date Formats

You can use the following date format values to control how dates appear in various places such as custom widgets, post metadata, news tickers, and more. These formats follow the standard PHP date formatting rules used by WordPress. Refer to the table below to choose a format that best fits your design and content style.

Format KeyExample Output
H:i00:50
g:i a12:50 am
g:i A12:50 AM
g:i:s a12:50:48 am
g:i:s A12:50:48 AM
d.m.y27.11.10
Y.m.d2010.11.27
Y-m-d2010-11-27
Y/m/d2010/11/27
m.d.Y11.27.2010
m-d-Y11-27-2010
m/d/Y11/27/2010
d.m.Y27.11.2010
d-m-Y27-11-2010
d/m/Y27/11/2010
m/d/Y g:i:s a11/27/2010 12:50:48 am
m/d/Y g:i:s A11/27/2010 12:50:48 AM
Y/m/d \a\t g:i a2010/11/27 at 12:50 am
Y/m/d \a\t g:i A2010/11/27 at 12:50 AM
d F27 November
F, YNovember, 2010
F j, YNovember 27, 2010
d M Y27 Nov 2010
M j, YNov 27, 2010
M j, Y @ H:iNov 27, 2010 @ 0:50
l, F j, YSaturday, November 27, 2010
l, F jS, YSaturday, November 27th, 2010